
Cranberry Ginger Scones
One of our favorite family traditions is putting together a fun selection of goodies for Christmas morning. Since we have a few family members who are vegan or gluten-free, these scones have been a reliable crowd pleaser whenever we are able to share these.
You will notice that I provided both weight and volume measurements for a few of these ingredients. I prefer baking with weight measurements because it is more accurate. However, due the small quantities of some of these ingredients, it may be easier to measure by volume.
This base dough is great if you want to experiment with other mix-ins, such as chocolate chips, blueberries, or anything else that inspires you. Just keep in mind that mix-ins with additional moisture (such as berries) may cause the scones spread more and affect the final texture scone. This recipe can also be doubled or tripled. Whatever you do, don't skip freezing the butter! This step creates that tender crumb and helps the scones rise.

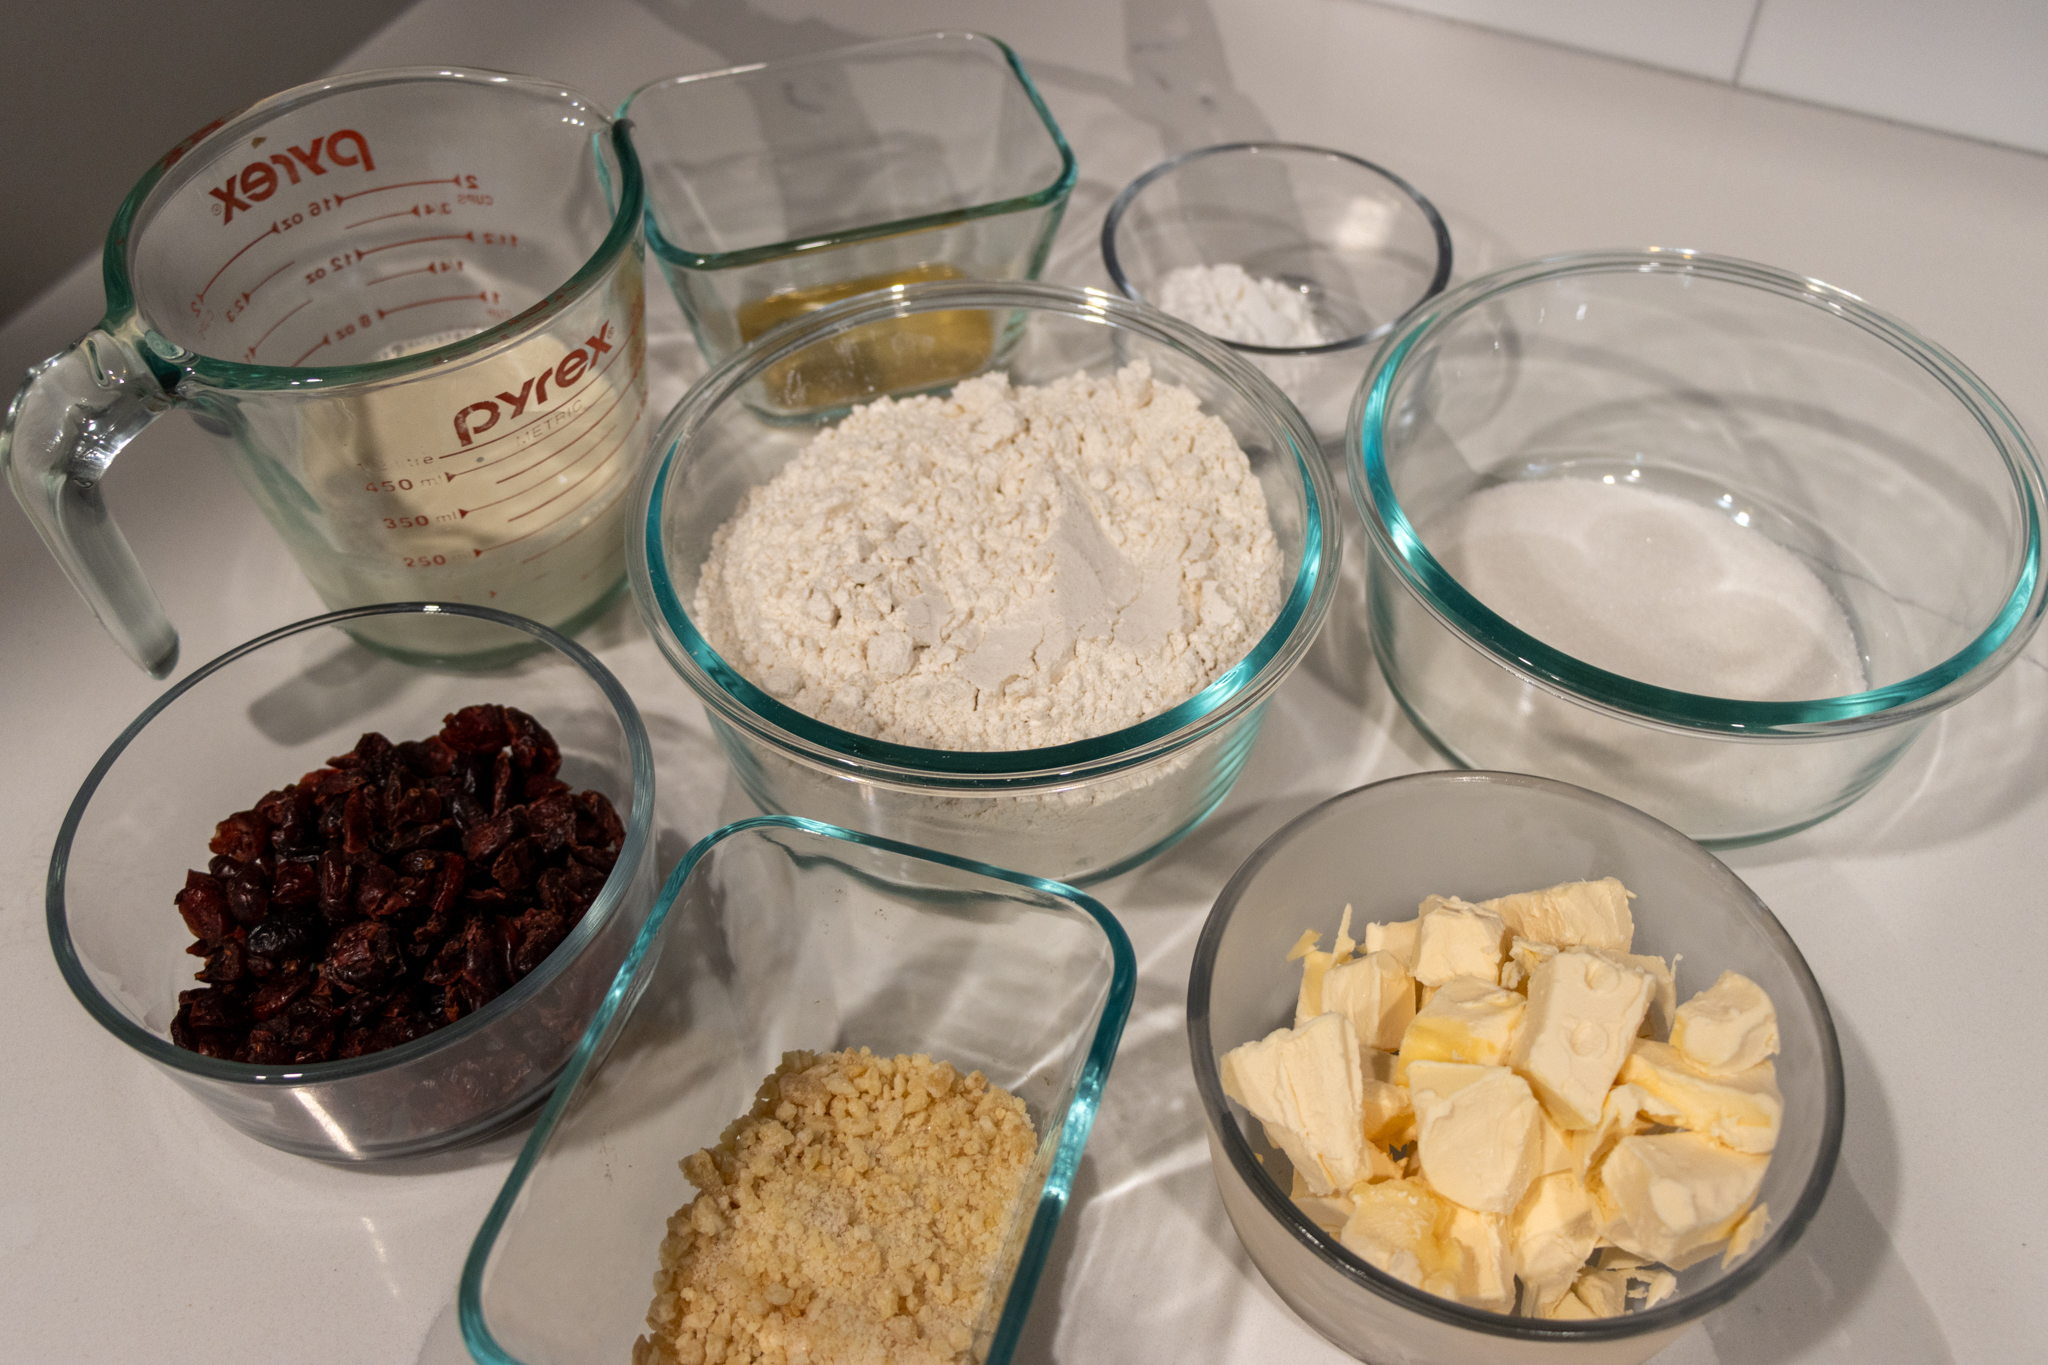
Ingredients

Freeze the Butter and Rehydrate Cranberries
-
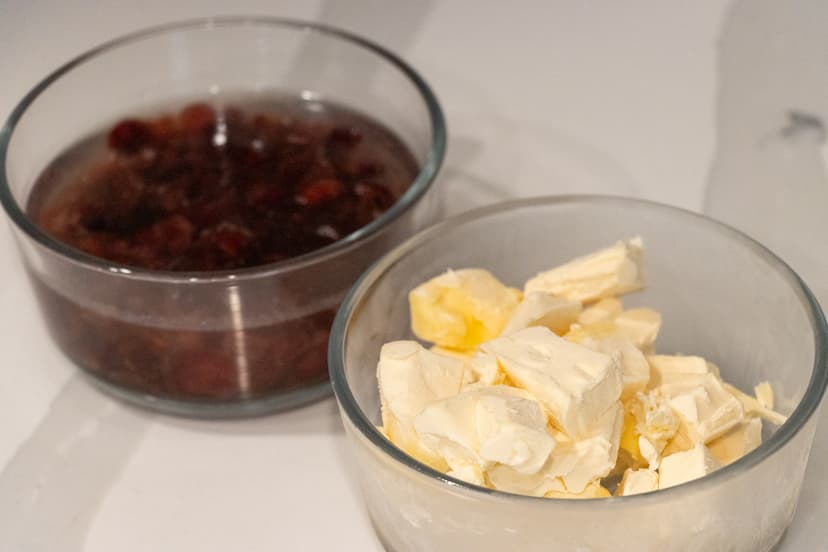
Freeze the Butter: Cut the vegan butter into ½ inch cubes/pieces and put in the freezer to solidify. Leave the butter to fully harden for at least two hours, but you could do this step days ahead of time.
-
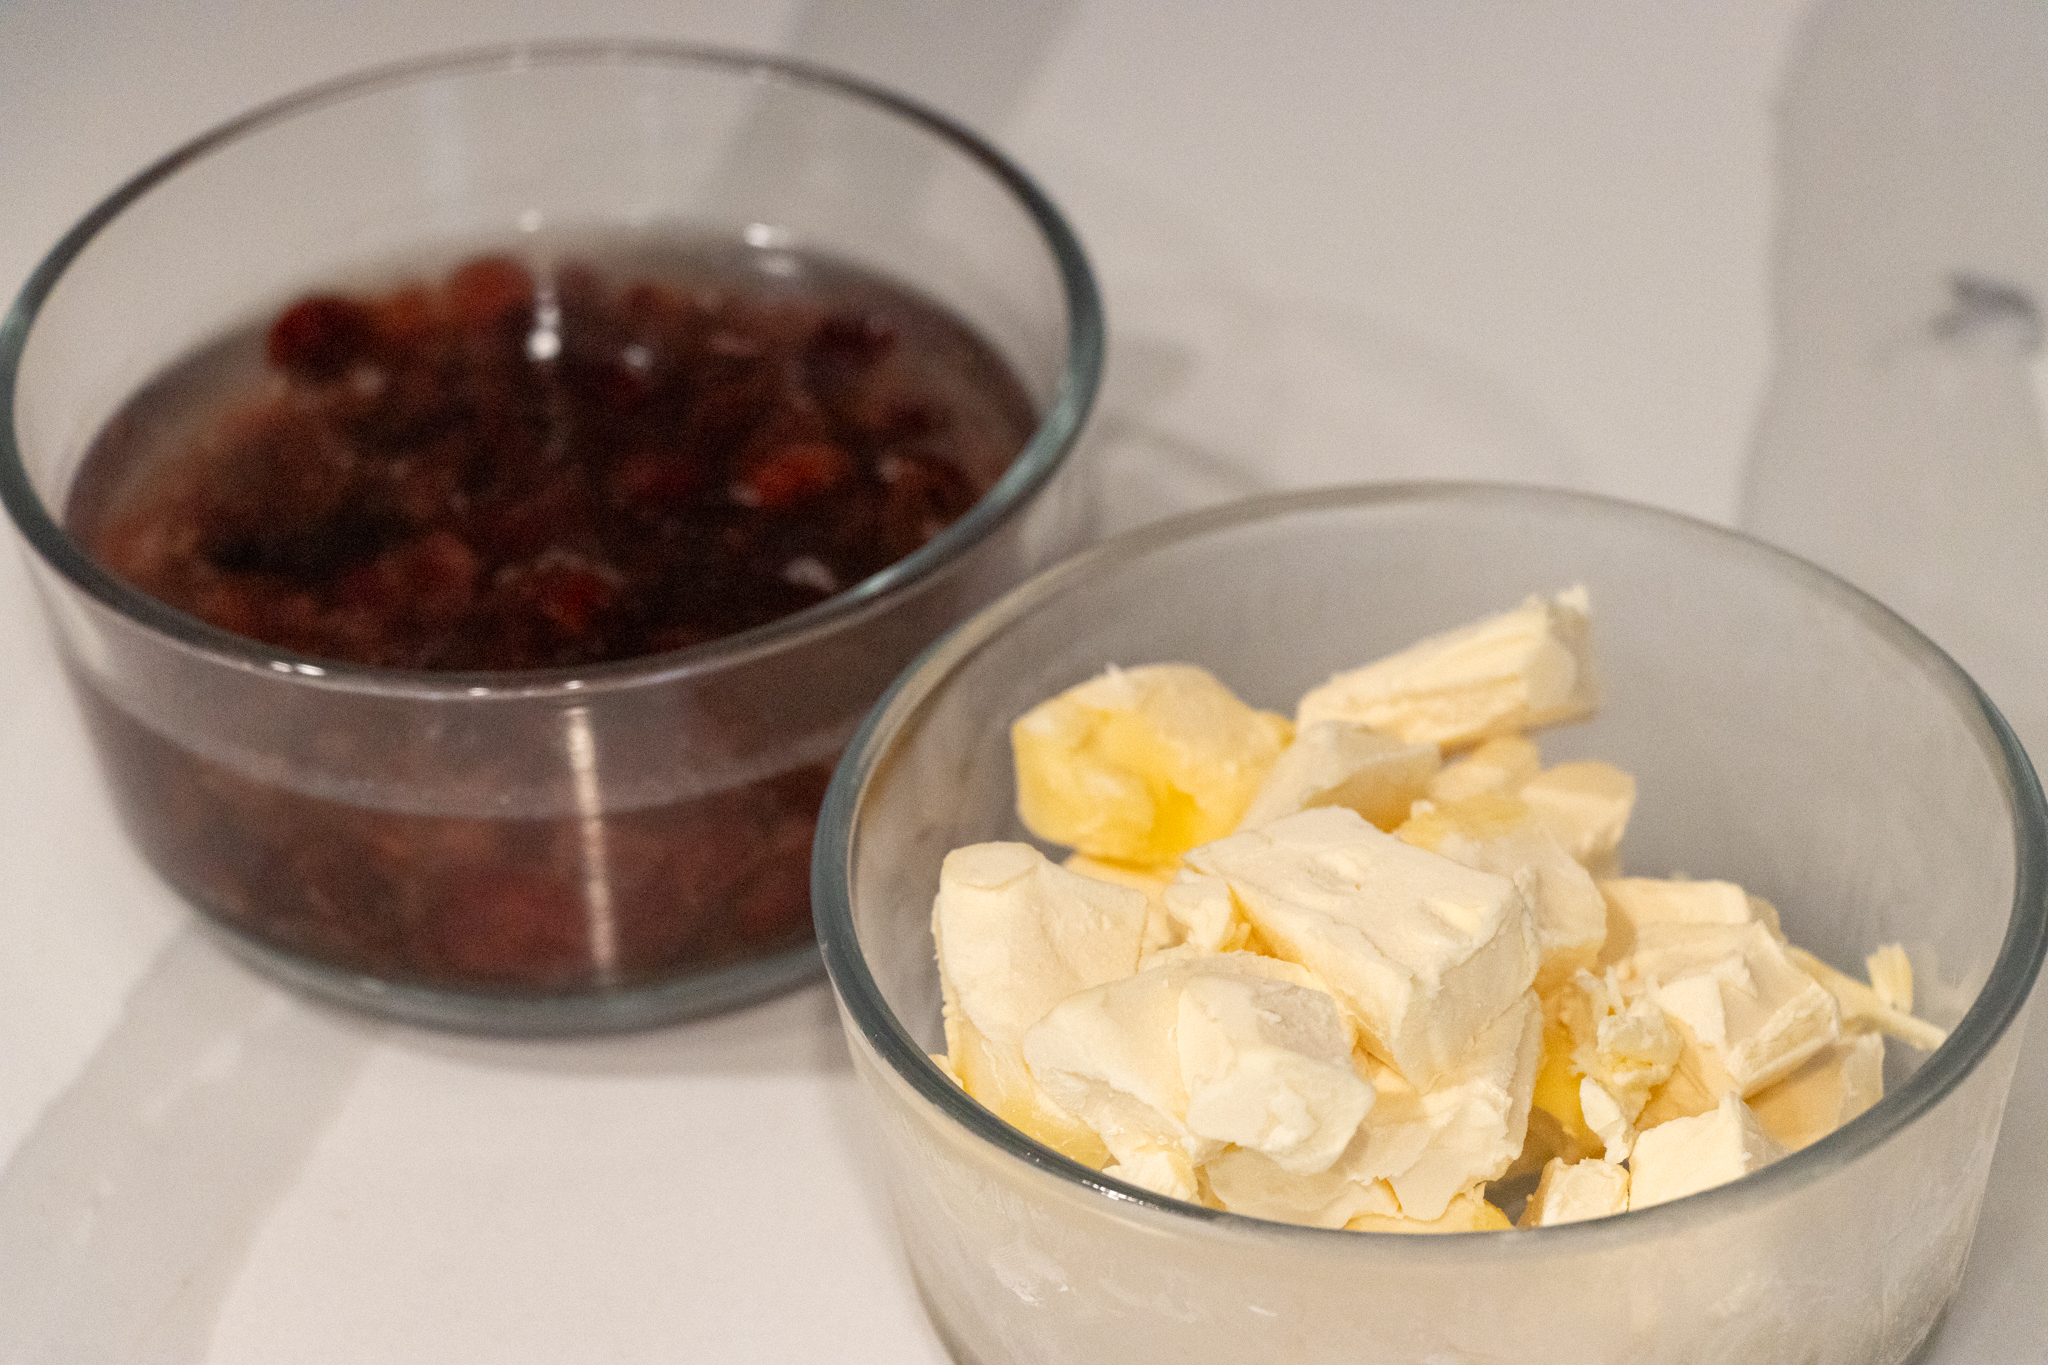
Rehydrate the Cranberries: Weigh the dried cranberries in a heat-safe bowl or glass container, and add hot water until about ½ inch of water is above the top of the cranberries. Let them rehydrate for at least 30 minutes, or up to 2 hours.
Tip: If you forget to rehydrate the cranberries, that is okay! You can still use dried cranberries in this recipe. The cranberries will be a bit chewier when baked and the scones will be slightly drier, as the dried cranberries will absorb a bit of the moisture. They will still taste delicious.
Tip: I will usually do steps 1 and 2 at the same time in the morning. Once the two hours are up, I will drain the cranberries and start mixing the scones. If you are able to let the cranberries sit for 2 hours, they will be much more plump and absorb less of the moisture in the scones. Do not let the cranberries sit for more than 2 hours, as they will start to fall apart and lose more of their flavor.

Now Let's Mix!
-
In the base of a stand mixer, sift in the flour and baking powder, and then add the salt and sugar. Add the paddle attachment. Sifting is not super necessary in this recipe, but the practice is always a good rule of thumb to do when baking as it increases the consistency of your product.
-
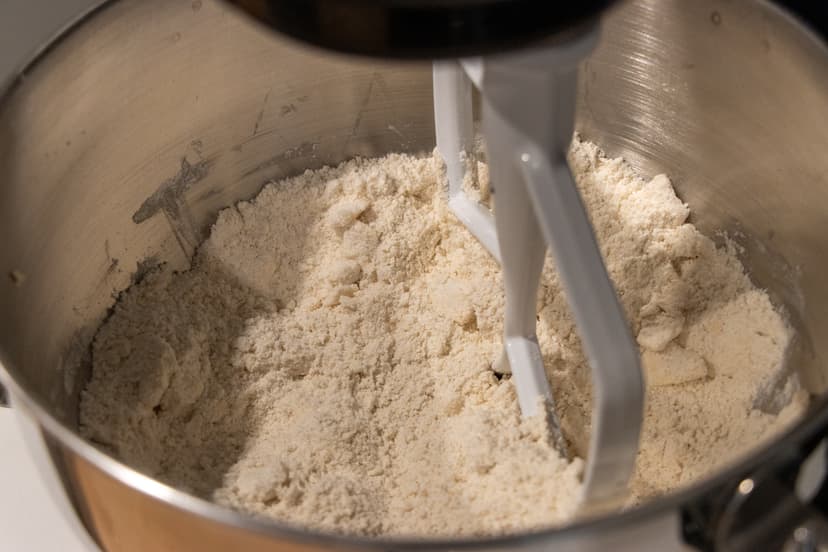
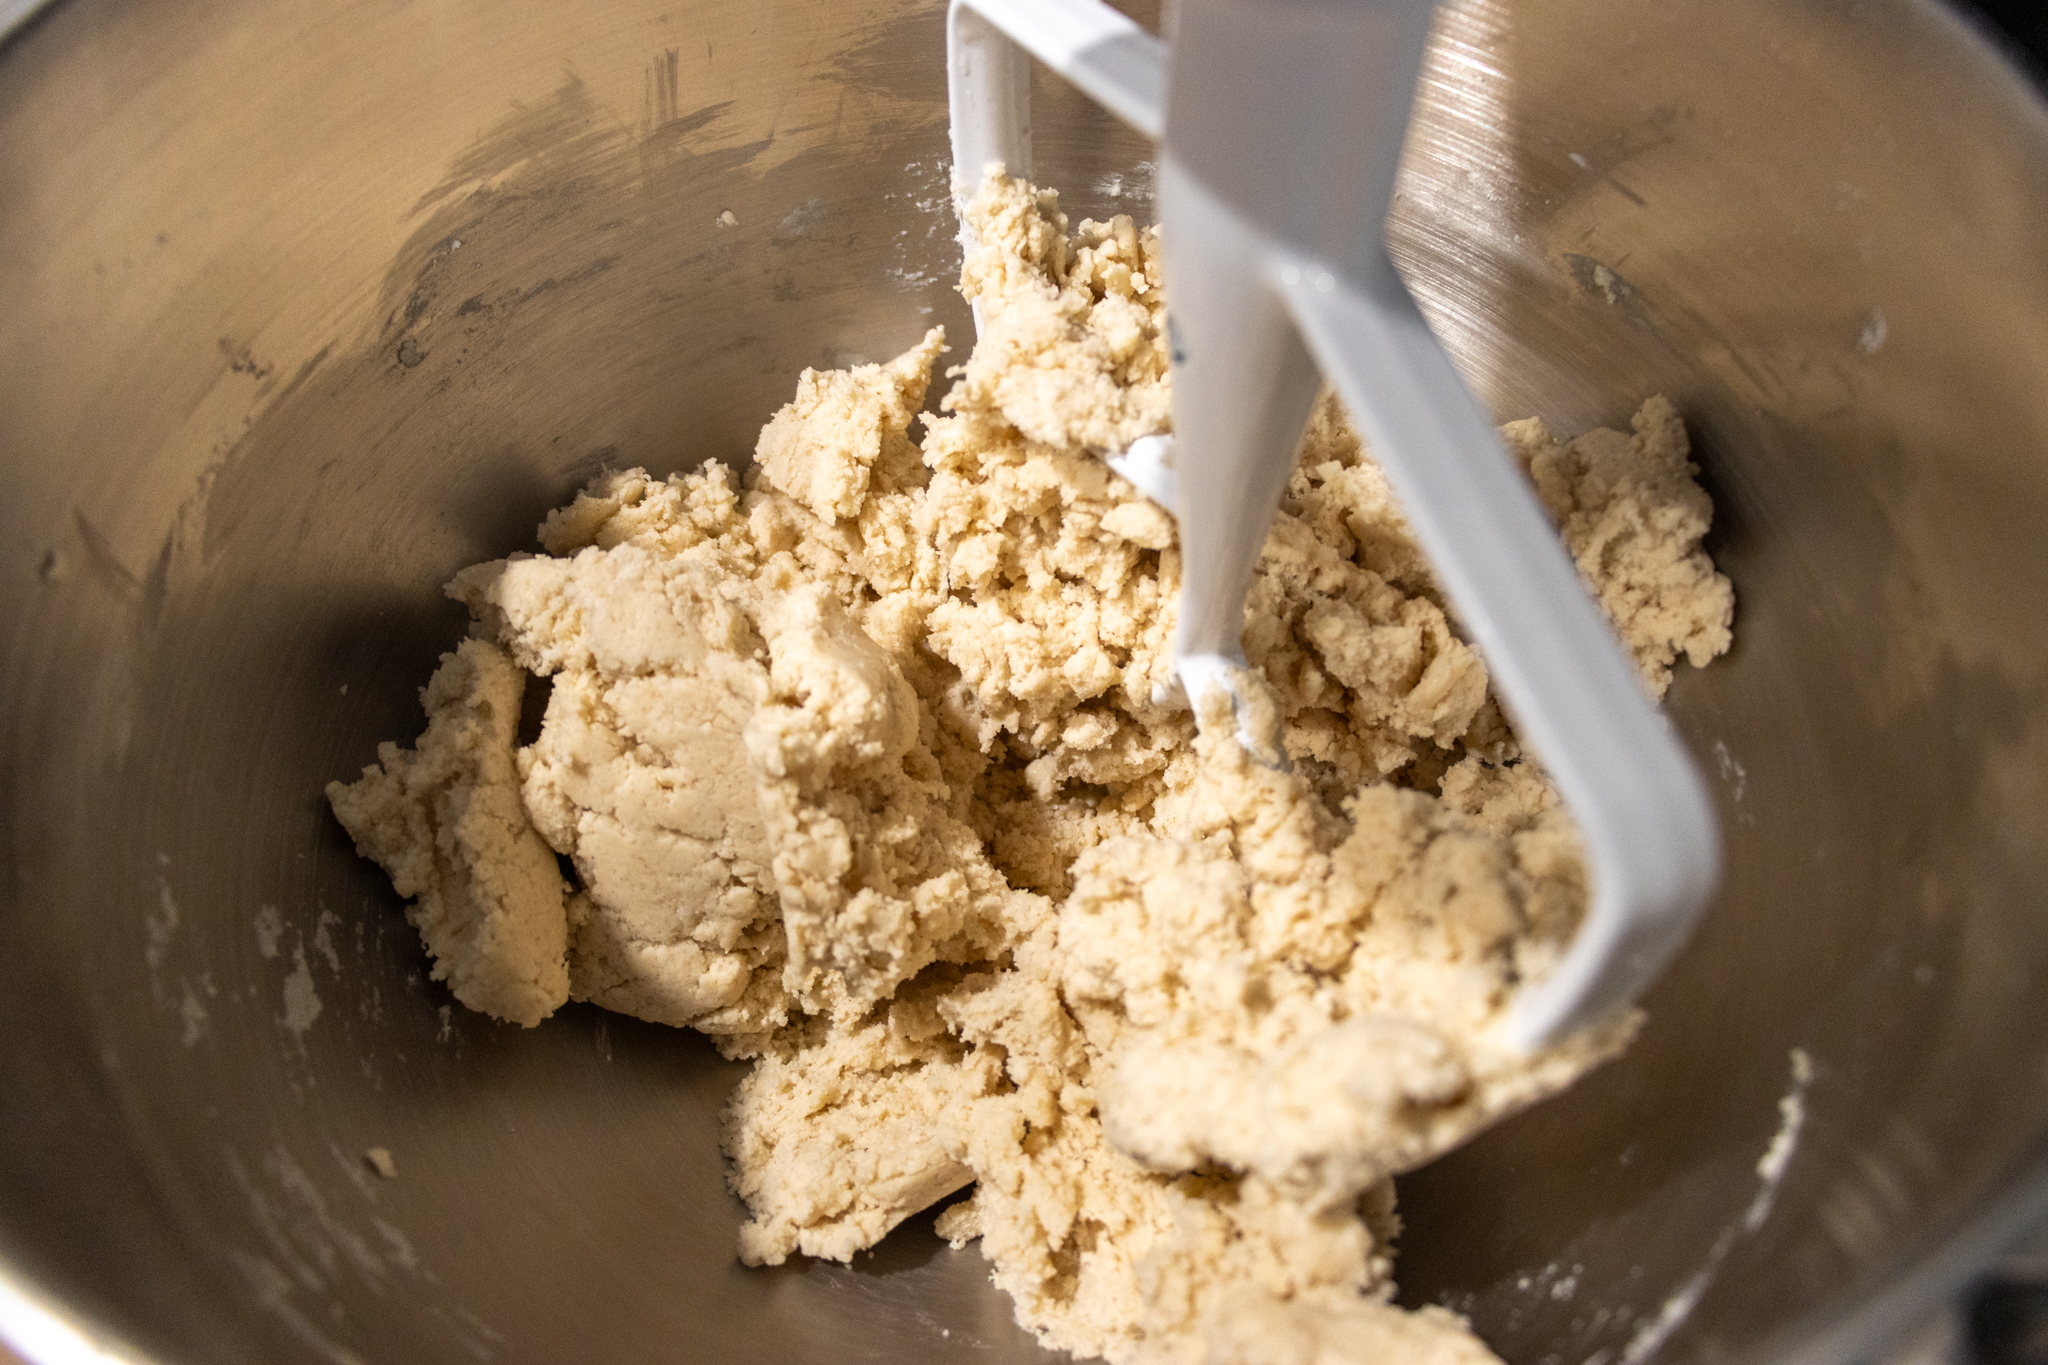
Add the frozen vegan butter chunks to the mixer and mix on "Stir" for 2 minutes, until the mixer stops "jumping". Then increase the speed to 2/3 (slow speed - depending on your mixer) and mix for another 1-2 minutes, until the mixture gets a slightly yellowish color and the butter chunks are slightly larger than pea-sized.
Tip: "Jumping" is not a very technical term, but it is the best way to describe what the mixer is doing when you start to mix in the frozen butter. When you add the frozen butter to the mixer, there is quite a bit of resistance between the mixer and the frozen butter, which causes the mixer to "jump". In some cases, the resistance can make the bowl pop off the mixer, so I recommend holding down the sides of the bowl for the first 30 seconds to a minute until it feels more tame. If you have a tilt-style mixer, make sure that you lock the top before starting this process. I would still recommend keeping an eye on it and holding it down if you feel it is necessary.

Add the Liquids
-
With the mixer on "Stir", slowly add in the oat milk and vanilla extract in a steady stream and continue mixing for about 5-10 seconds after all the milk and vanilla have been added. The mixture will look pretty crumbly, but large chunks should be forming
-
Scrape down the bowl and paddle, and mix for another 10-15 seconds. If you haven't drained your cranberries yet, now is the time!
Tip: To drain the cranberries, I recommend using a sieve/sifter to drain the cranberries over the sink, and then press down on them to remove excess liquid. We want to avoid excess moisture in the scones, as that will cause the scones to spread more and affect the final texture of the scone.
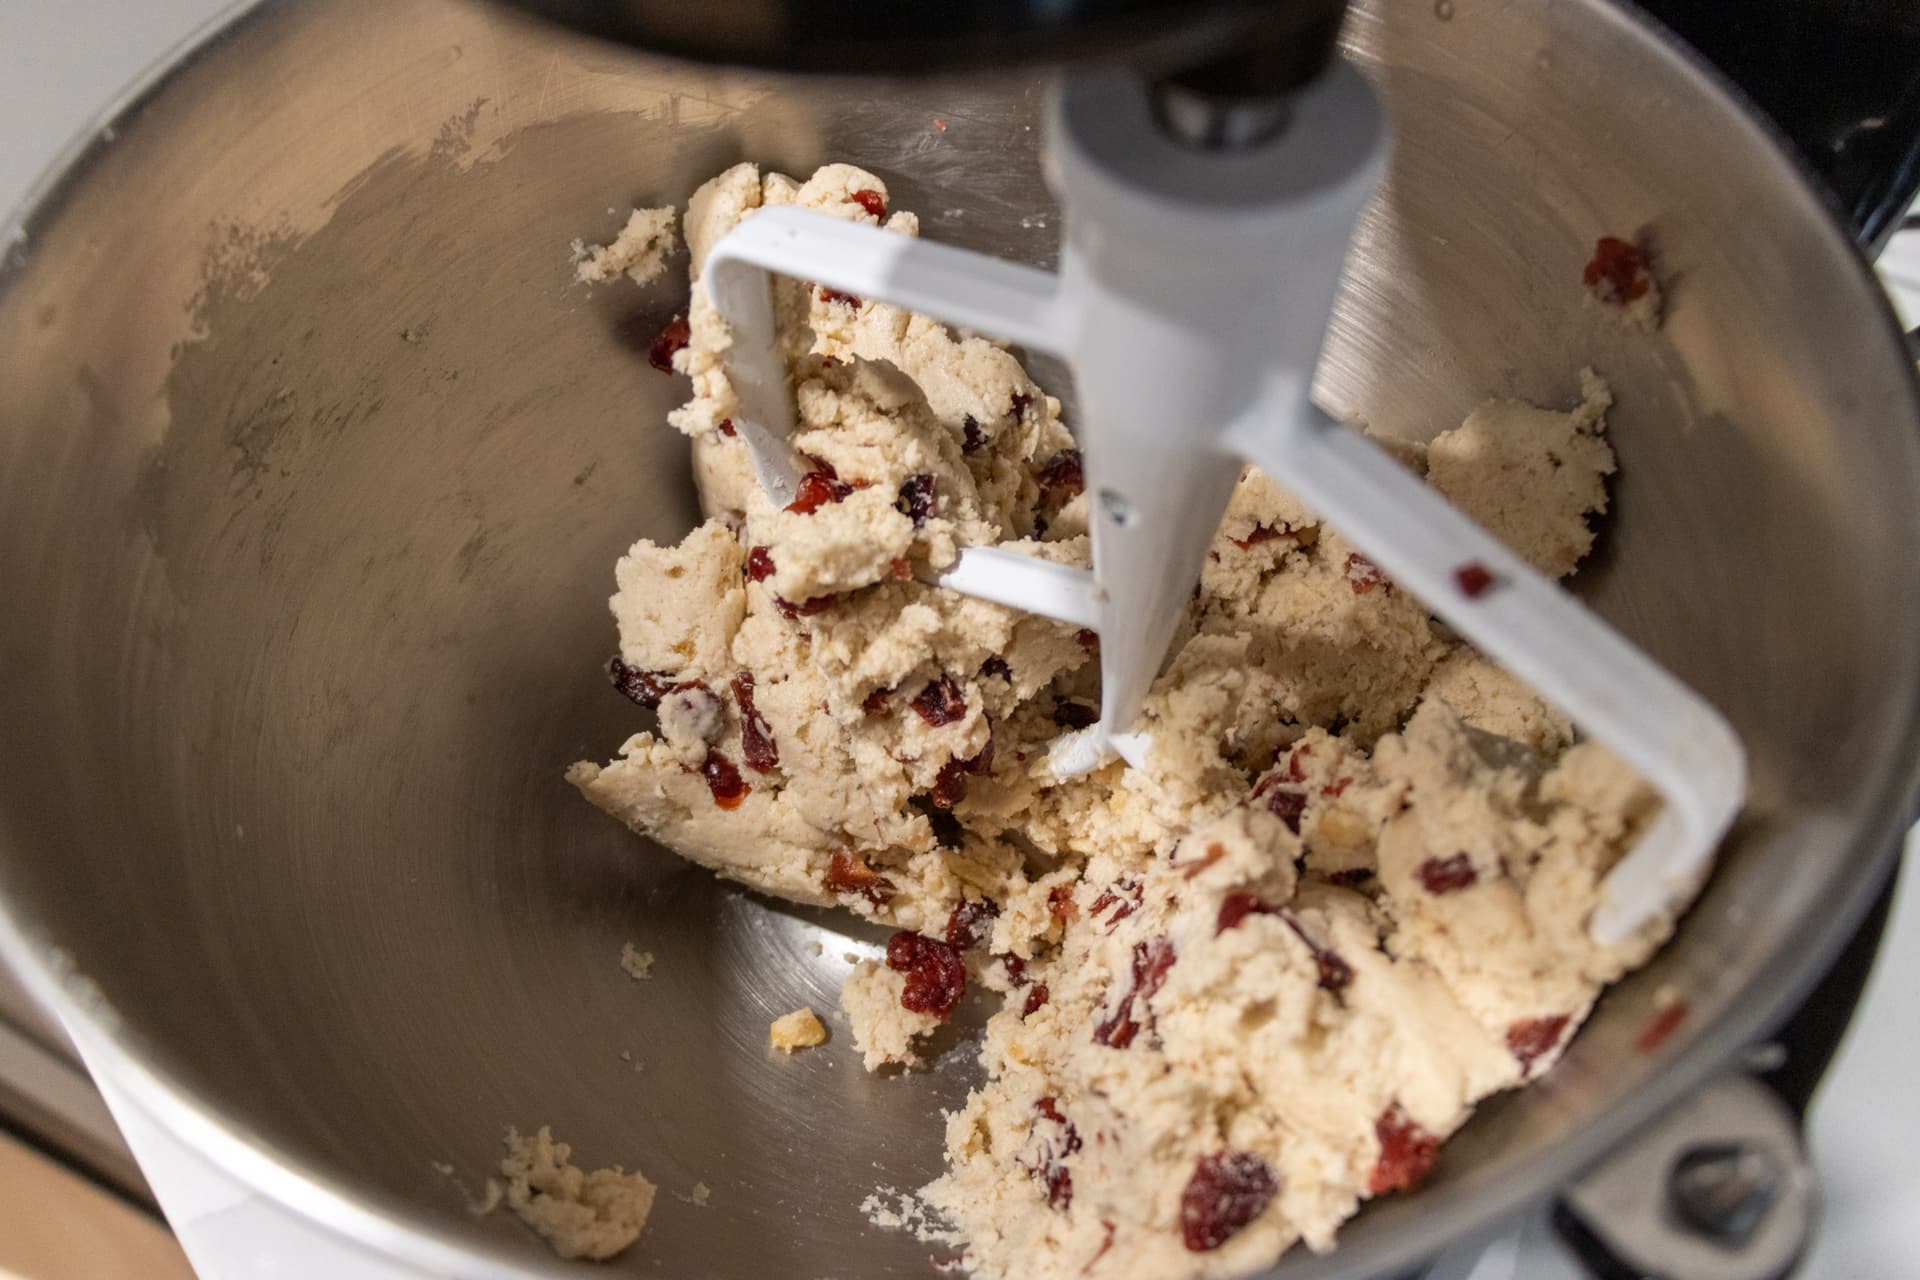
Add the Mix-Ins
- Add the cranberries and candied ginger and set the mixer to "Stir" for another 10 seconds or until the mixture comes away from the bowl and forms a cohesive dough on the paddle. There may be a few dry bits on the bottom, that is okay! We will incorporate them on the next step.

Form the Dough Ball
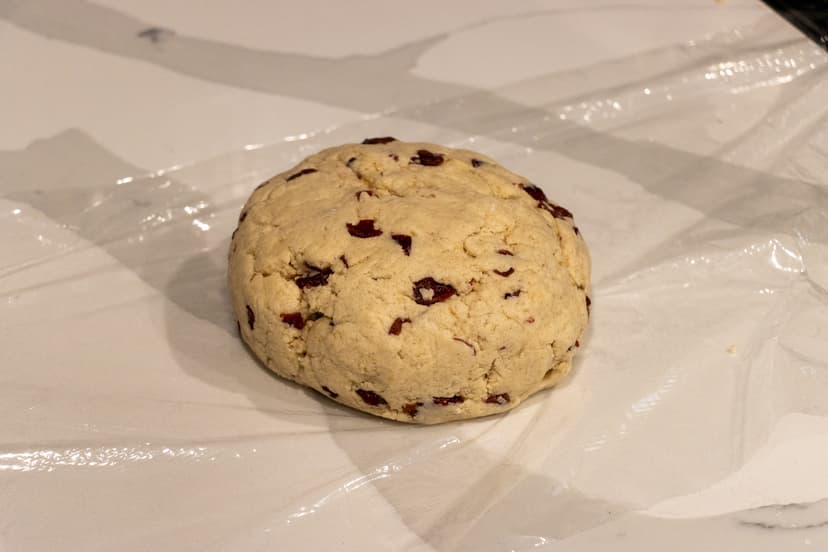
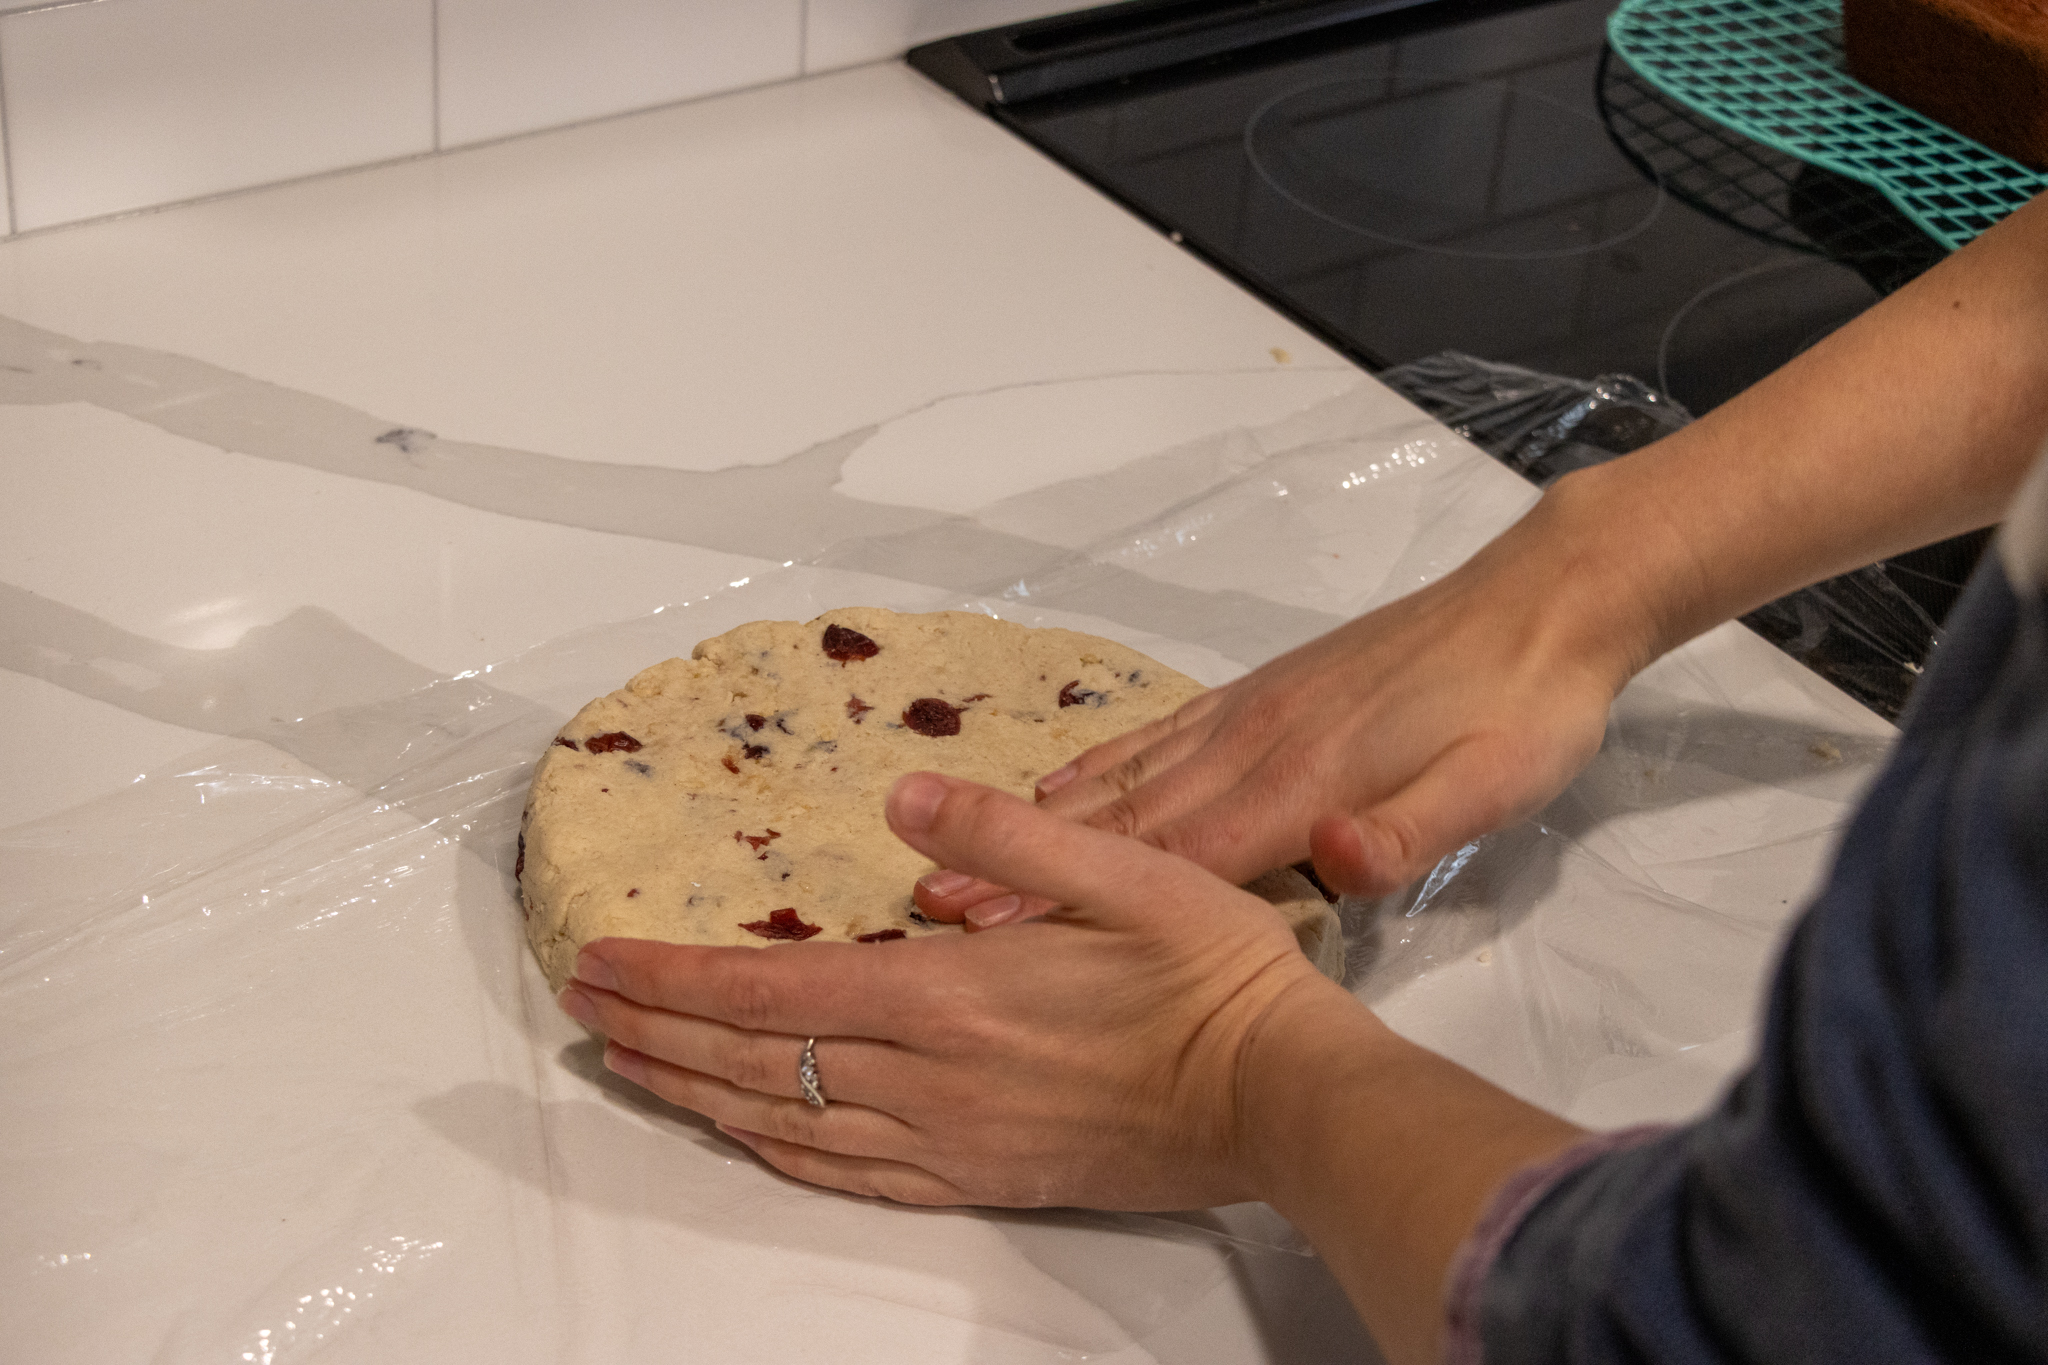
- Remove the dough from the bowl and place it in the center of a piece of plastic wrap (about 2-3 feet in length should be good!) and work it together into a ball. It might a little working, but try not to do too much, as overworking the dough will make it tough.

Flatten the Dough
-
Next, we want to form a disk with the dough. Since the dough is already in a ball, you will want to gently flatten the dough into a disk. For this recipe, I will flatten the scone to be an 8 inch circle at about 1 - 1 ¼ inches in height. If you prefer a flatter scone, or you want more scones out of the batch, you can flatten the dough to a 9-10 inch circle.
-
Wrap the disk in plastic wrap so it is fully covered and not exposed, and place in the refrigerator and chill for at least 1 hour.
Tip: You can make this dough in advance, even up to two days! If you are having company and want freshly baked scones, this is a great way to save you time in the morning or while your company is visiting.
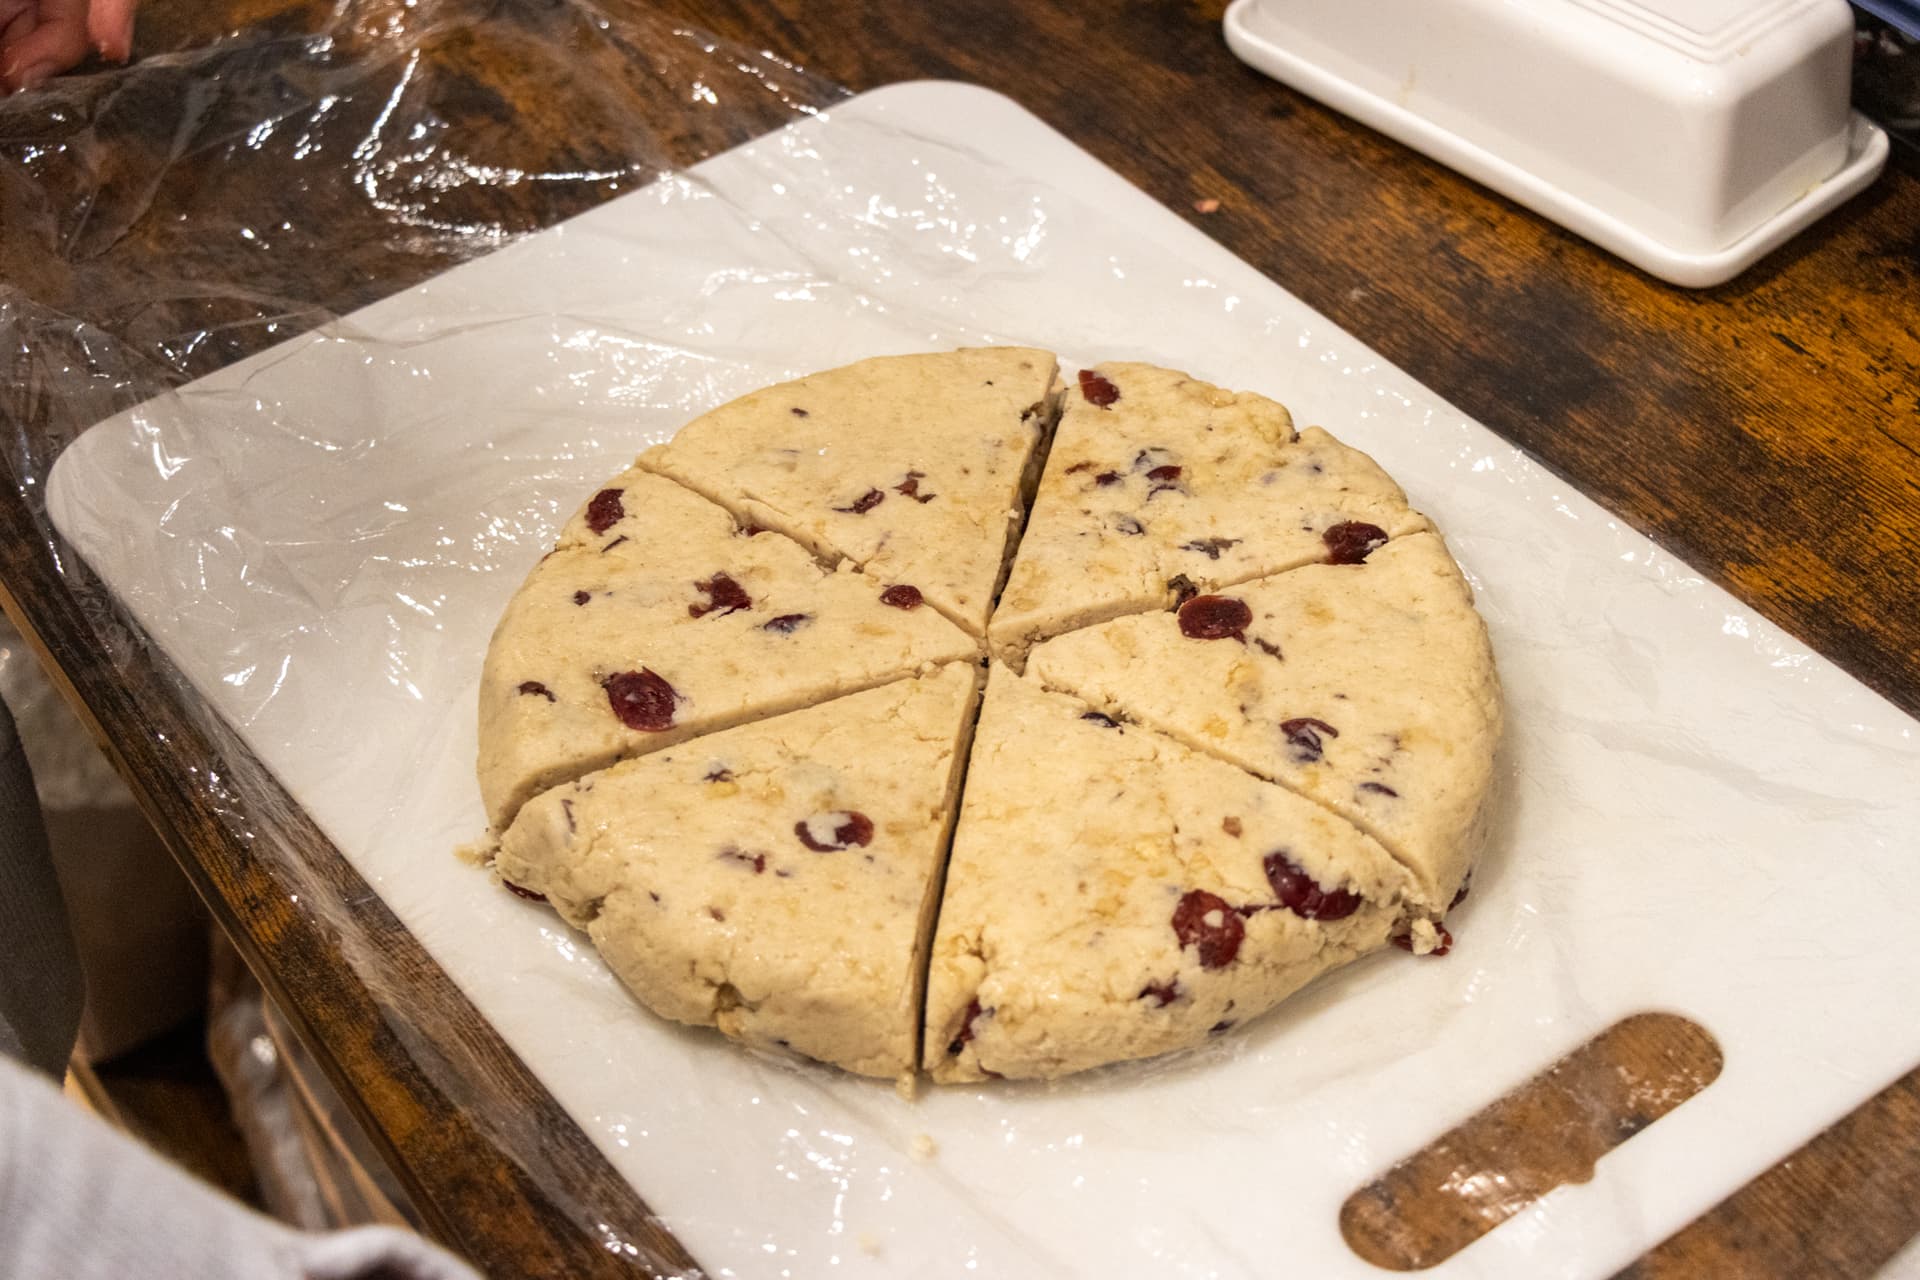
Cut the Scones
- Once the dough has chilled, it's time to cut them! I cut these into 6 pieces, which are pretty good-sized scones. You can certainly cut these scones into 8 pieces if you prefer. Please know that baking time will vary depending on the amount of scones and how thick they are.
Tip: You can either eyeball this step, or, if you prefer more precision, cut and weigh each scone. The dough is pretty pliable, so it is easy to do some patchwork if needed. If you are cutting 6 pieces, they should weigh around 150g each.
Tip: You can either bake these right away, refrigerate them longer, or even freeze them! The more time you give these to chill, the less likely they will spread in the oven and the scones will be slightly taller. If you don't care, then bake away!
Time to Bake!
-
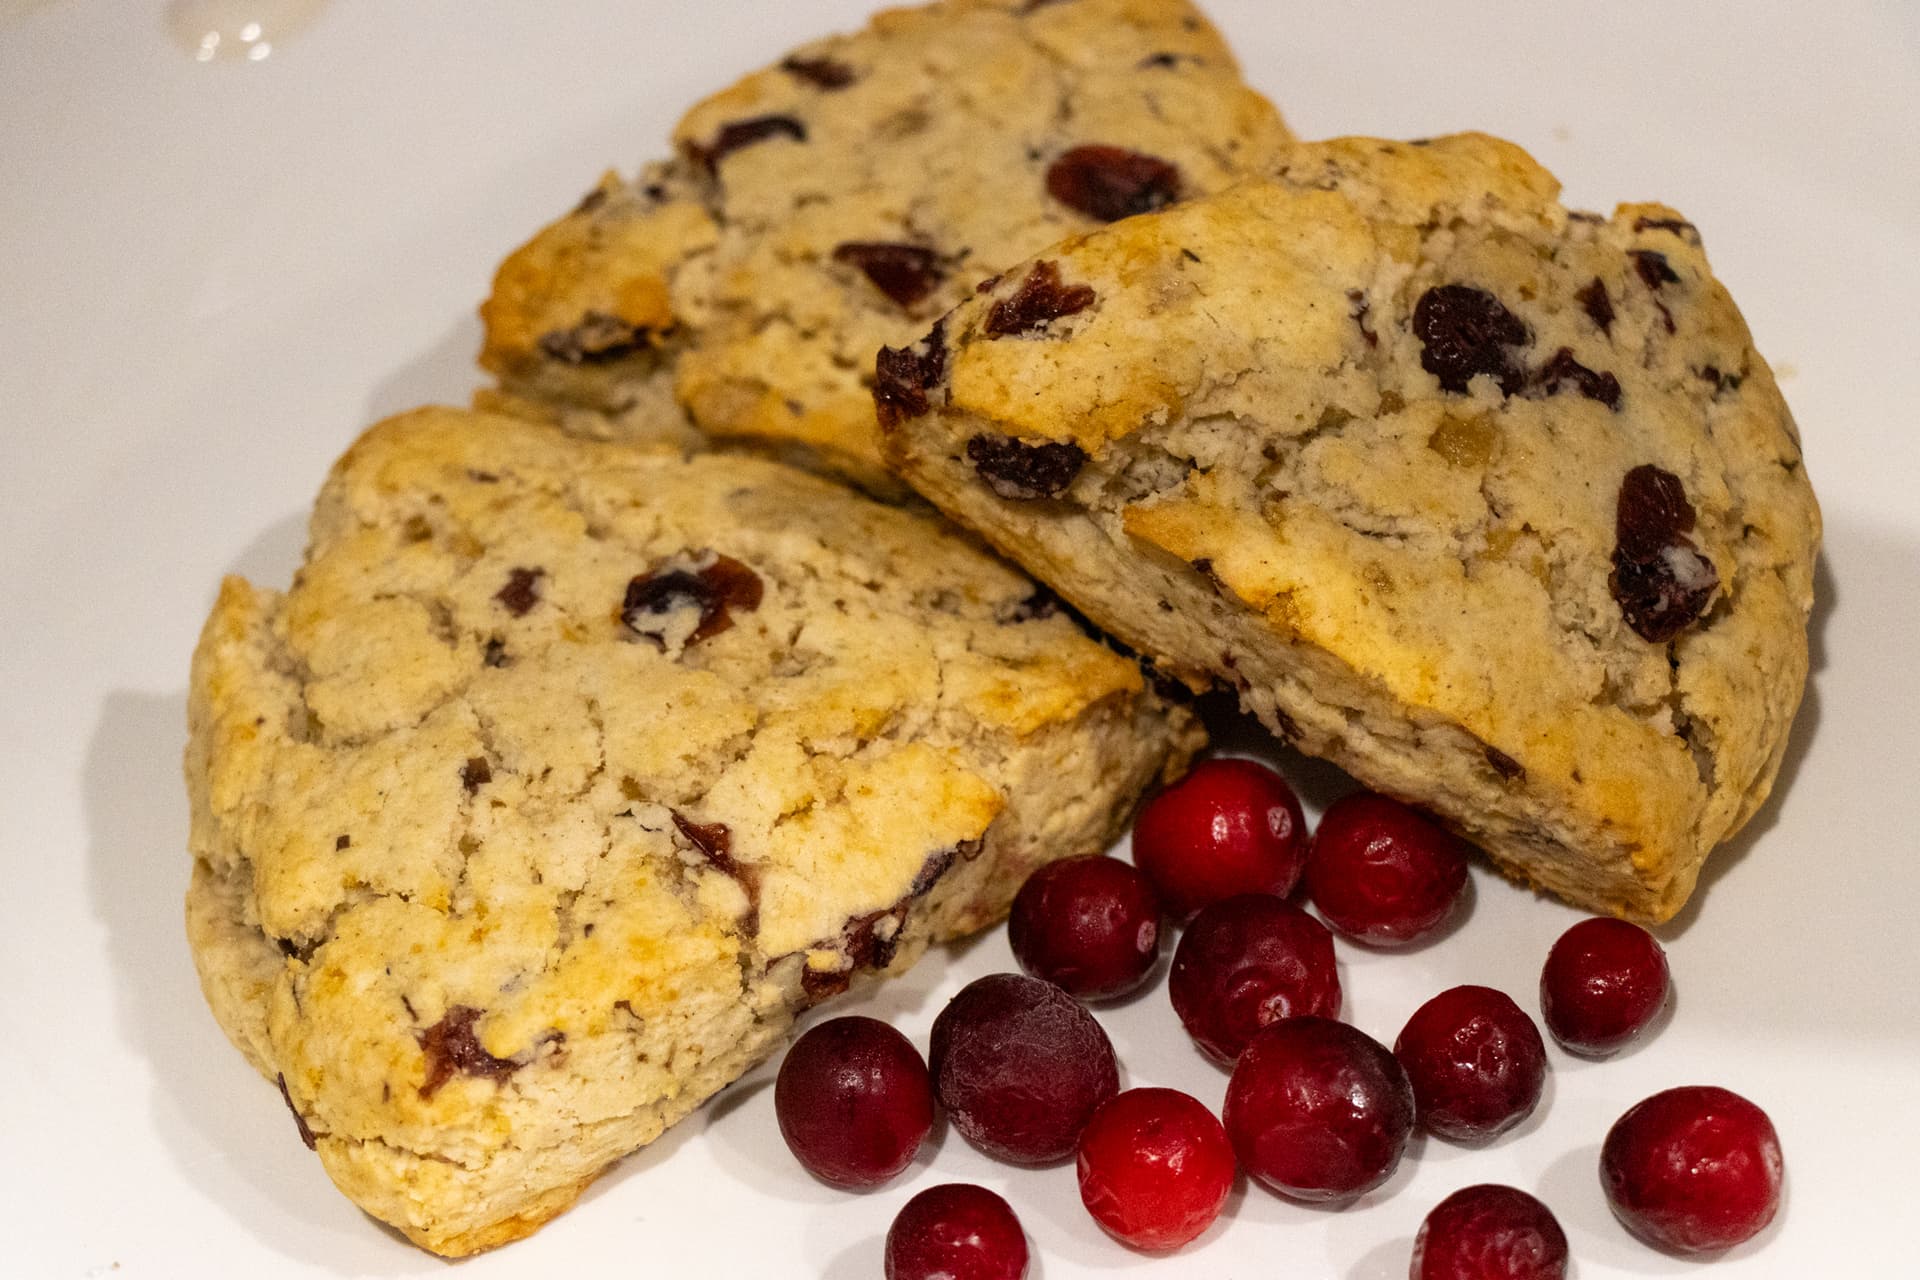
When you are ready to bake, place the scone on a parchment-lined baking sheet with a couple of inches of space between each (all 6 scones will fit on one regular sized baking sheet). Bake the scones at 375°F for 15 minutes, rotate the pan, and then bake for another 5-10 minutes until the edges are golden brown. The tops will still remain slightly pale but you will see cracks forming on the top and the edges will be golden brown. If you are baking from frozen, the scones will take longer to bake. I would suggest giving them an extra 5 minutes and checking on the color.
-
Once the scones are baked and out of the oven, let them cool on the baking sheet for 10 minutes and then transfer to a cooling rack. You can eat them right away, store in an airtight container on the counter for 3 days, or even freeze them for up to 2 months! I love freezing these scones because they stand up well in the freezer and taste fresh when you pull them out. If I am serving these from frozen, I would recommend letting them thaw at room temperature and then put them in the oven at 300°F for 3-5 minutes or until they are warm and the edges are a bit crisp.
Cranberry Ginger Scones
One of our favorite family traditions is putting together a fun selection of goodies for Christmas morning. Since we have a few family members who are vegan or gluten-free, these scones have been a reliable crowd pleaser whenever we are able to share these.
You will notice that I provided both weight and volume measurements for a few of these ingredients. I prefer baking with weight measurements because it is more accurate. However, due the small quantities of some of these ingredients, it may be easier to measure by volume.
This base dough is great if you want to experiment with other mix-ins, such as chocolate chips, blueberries, or anything else that inspires you. Just keep in mind that mix-ins with additional moisture (such as berries) may cause the scones spread more and affect the final texture scone. This recipe can also be doubled or tripled. Whatever you do, don't skip freezing the butter! This step creates that tender crumb and helps the scones rise.

Ingredients

Freeze the Butter and Rehydrate Cranberries
-
Freeze the Butter: Cut the vegan butter into ½ inch cubes/pieces and put in the freezer to solidify. Leave the butter to fully harden for at least two hours, but you could do this step days ahead of time.
-
Rehydrate the Cranberries: Weigh the dried cranberries in a heat-safe bowl or glass container, and add hot water until about ½ inch of water is above the top of the cranberries. Let them rehydrate for at least 30 minutes, or up to 2 hours.
Tip: If you forget to rehydrate the cranberries, that is okay! You can still use dried cranberries in this recipe. The cranberries will be a bit chewier when baked and the scones will be slightly drier, as the dried cranberries will absorb a bit of the moisture. They will still taste delicious.
Tip: I will usually do steps 1 and 2 at the same time in the morning. Once the two hours are up, I will drain the cranberries and start mixing the scones. If you are able to let the cranberries sit for 2 hours, they will be much more plump and absorb less of the moisture in the scones. Do not let the cranberries sit for more than 2 hours, as they will start to fall apart and lose more of their flavor.
Now Let's Mix!
-
In the base of a stand mixer, sift in the flour and baking powder, and then add the salt and sugar. Add the paddle attachment. Sifting is not super necessary in this recipe, but the practice is always a good rule of thumb to do when baking as it increases the consistency of your product.
-
Add the frozen vegan butter chunks to the mixer and mix on "Stir" for 2 minutes, until the mixer stops "jumping". Then increase the speed to 2/3 (slow speed - depending on your mixer) and mix for another 1-2 minutes, until the mixture gets a slightly yellowish color and the butter chunks are slightly larger than pea-sized.
Tip: "Jumping" is not a very technical term, but it is the best way to describe what the mixer is doing when you start to mix in the frozen butter. When you add the frozen butter to the mixer, there is quite a bit of resistance between the mixer and the frozen butter, which causes the mixer to "jump". In some cases, the resistance can make the bowl pop off the mixer, so I recommend holding down the sides of the bowl for the first 30 seconds to a minute until it feels more tame. If you have a tilt-style mixer, make sure that you lock the top before starting this process. I would still recommend keeping an eye on it and holding it down if you feel it is necessary.
Add the Liquids
-
With the mixer on "Stir", slowly add in the oat milk and vanilla extract in a steady stream and continue mixing for about 5-10 seconds after all the milk and vanilla have been added. The mixture will look pretty crumbly, but large chunks should be forming
-
Scrape down the bowl and paddle, and mix for another 10-15 seconds. If you haven't drained your cranberries yet, now is the time!
Tip: To drain the cranberries, I recommend using a sieve/sifter to drain the cranberries over the sink, and then press down on them to remove excess liquid. We want to avoid excess moisture in the scones, as that will cause the scones to spread more and affect the final texture of the scone.

Add the Mix-Ins
- Add the cranberries and candied ginger and set the mixer to "Stir" for another 10 seconds or until the mixture comes away from the bowl and forms a cohesive dough on the paddle. There may be a few dry bits on the bottom, that is okay! We will incorporate them on the next step.

Form the Dough Ball
- Remove the dough from the bowl and place it in the center of a piece of plastic wrap (about 2-3 feet in length should be good!) and work it together into a ball. It might a little working, but try not to do too much, as overworking the dough will make it tough.
Flatten the Dough
-
Next, we want to form a disk with the dough. Since the dough is already in a ball, you will want to gently flatten the dough into a disk. For this recipe, I will flatten the scone to be an 8 inch circle at about 1 - 1 ¼ inches in height. If you prefer a flatter scone, or you want more scones out of the batch, you can flatten the dough to a 9-10 inch circle.
-
Wrap the disk in plastic wrap so it is fully covered and not exposed, and place in the refrigerator and chill for at least 1 hour.
Tip: You can make this dough in advance, even up to two days! If you are having company and want freshly baked scones, this is a great way to save you time in the morning or while your company is visiting.

Cut the Scones
- Once the dough has chilled, it's time to cut them! I cut these into 6 pieces, which are pretty good-sized scones. You can certainly cut these scones into 8 pieces if you prefer. Please know that baking time will vary depending on the amount of scones and how thick they are.
Tip: You can either eyeball this step, or, if you prefer more precision, cut and weigh each scone. The dough is pretty pliable, so it is easy to do some patchwork if needed. If you are cutting 6 pieces, they should weigh around 150g each.
Tip: You can either bake these right away, refrigerate them longer, or even freeze them! The more time you give these to chill, the less likely they will spread in the oven and the scones will be slightly taller. If you don't care, then bake away!

Time to Bake!
-
When you are ready to bake, place the scone on a parchment-lined baking sheet with a couple of inches of space between each (all 6 scones will fit on one regular sized baking sheet). Bake the scones at 375°F for 15 minutes, rotate the pan, and then bake for another 5-10 minutes until the edges are golden brown. The tops will still remain slightly pale but you will see cracks forming on the top and the edges will be golden brown. If you are baking from frozen, the scones will take longer to bake. I would suggest giving them an extra 5 minutes and checking on the color.
-
Once the scones are baked and out of the oven, let them cool on the baking sheet for 10 minutes and then transfer to a cooling rack. You can eat them right away, store in an airtight container on the counter for 3 days, or even freeze them for up to 2 months! I love freezing these scones because they stand up well in the freezer and taste fresh when you pull them out. If I am serving these from frozen, I would recommend letting them thaw at room temperature and then put them in the oven at 300°F for 3-5 minutes or until they are warm and the edges are a bit crisp.

Cranberry Ginger Scones

One of our favorite family traditions is putting together a fun selection of goodies for Christmas morning. Since we have a few family members who are vegan or gluten-free, these scones have been a reliable crowd pleaser whenever we are able to share these.
You will notice that I provided both weight and volume measurements for a few of these ingredients. I prefer baking with weight measurements because it is more accurate. However, due the small quantities of some of these ingredients, it may be easier to measure by volume.
This base dough is great if you want to experiment with other mix-ins, such as chocolate chips, blueberries, or anything else that inspires you. Just keep in mind that mix-ins with additional moisture (such as berries) may cause the scones spread more and affect the final texture scone. This recipe can also be doubled or tripled. Whatever you do, don't skip freezing the butter! This step creates that tender crumb and helps the scones rise.
Ingredients
Freeze the Butter and Rehydrate Cranberries
-
Freeze the Butter: Cut the vegan butter into ½ inch cubes/pieces and put in the freezer to solidify. Leave the butter to fully harden for at least two hours, but you could do this step days ahead of time.
-
Rehydrate the Cranberries: Weigh the dried cranberries in a heat-safe bowl or glass container, and add hot water until about ½ inch of water is above the top of the cranberries. Let them rehydrate for at least 30 minutes, or up to 2 hours.
Tip: If you forget to rehydrate the cranberries, that is okay! You can still use dried cranberries in this recipe. The cranberries will be a bit chewier when baked and the scones will be slightly drier, as the dried cranberries will absorb a bit of the moisture. They will still taste delicious.
Tip: I will usually do steps 1 and 2 at the same time in the morning. Once the two hours are up, I will drain the cranberries and start mixing the scones. If you are able to let the cranberries sit for 2 hours, they will be much more plump and absorb less of the moisture in the scones. Do not let the cranberries sit for more than 2 hours, as they will start to fall apart and lose more of their flavor.
Now Let's Mix!

-
In the base of a stand mixer, sift in the flour and baking powder, and then add the salt and sugar. Add the paddle attachment. Sifting is not super necessary in this recipe, but the practice is always a good rule of thumb to do when baking as it increases the consistency of your product.
-
Add the frozen vegan butter chunks to the mixer and mix on "Stir" for 2 minutes, until the mixer stops "jumping". Then increase the speed to 2/3 (slow speed - depending on your mixer) and mix for another 1-2 minutes, until the mixture gets a slightly yellowish color and the butter chunks are slightly larger than pea-sized.
Tip: "Jumping" is not a very technical term, but it is the best way to describe what the mixer is doing when you start to mix in the frozen butter. When you add the frozen butter to the mixer, there is quite a bit of resistance between the mixer and the frozen butter, which causes the mixer to "jump". In some cases, the resistance can make the bowl pop off the mixer, so I recommend holding down the sides of the bowl for the first 30 seconds to a minute until it feels more tame. If you have a tilt-style mixer, make sure that you lock the top before starting this process. I would still recommend keeping an eye on it and holding it down if you feel it is necessary.
Add the Liquids
-
With the mixer on "Stir", slowly add in the oat milk and vanilla extract in a steady stream and continue mixing for about 5-10 seconds after all the milk and vanilla have been added. The mixture will look pretty crumbly, but large chunks should be forming
-
Scrape down the bowl and paddle, and mix for another 10-15 seconds. If you haven't drained your cranberries yet, now is the time!
Tip: To drain the cranberries, I recommend using a sieve/sifter to drain the cranberries over the sink, and then press down on them to remove excess liquid. We want to avoid excess moisture in the scones, as that will cause the scones to spread more and affect the final texture of the scone.
Add the Mix-Ins

- Add the cranberries and candied ginger and set the mixer to "Stir" for another 10 seconds or until the mixture comes away from the bowl and forms a cohesive dough on the paddle. There may be a few dry bits on the bottom, that is okay! We will incorporate them on the next step.
Form the Dough Ball

- Remove the dough from the bowl and place it in the center of a piece of plastic wrap (about 2-3 feet in length should be good!) and work it together into a ball. It might a little working, but try not to do too much, as overworking the dough will make it tough.
Flatten the Dough
-
Next, we want to form a disk with the dough. Since the dough is already in a ball, you will want to gently flatten the dough into a disk. For this recipe, I will flatten the scone to be an 8 inch circle at about 1 - 1 ¼ inches in height. If you prefer a flatter scone, or you want more scones out of the batch, you can flatten the dough to a 9-10 inch circle.
-
Wrap the disk in plastic wrap so it is fully covered and not exposed, and place in the refrigerator and chill for at least 1 hour.
Tip: You can make this dough in advance, even up to two days! If you are having company and want freshly baked scones, this is a great way to save you time in the morning or while your company is visiting.
Cut the Scones

- Once the dough has chilled, it's time to cut them! I cut these into 6 pieces, which are pretty good-sized scones. You can certainly cut these scones into 8 pieces if you prefer. Please know that baking time will vary depending on the amount of scones and how thick they are.
Tip: You can either eyeball this step, or, if you prefer more precision, cut and weigh each scone. The dough is pretty pliable, so it is easy to do some patchwork if needed. If you are cutting 6 pieces, they should weigh around 150g each.
Tip: You can either bake these right away, refrigerate them longer, or even freeze them! The more time you give these to chill, the less likely they will spread in the oven and the scones will be slightly taller. If you don't care, then bake away!
Time to Bake!

-
When you are ready to bake, place the scone on a parchment-lined baking sheet with a couple of inches of space between each (all 6 scones will fit on one regular sized baking sheet). Bake the scones at 375°F for 15 minutes, rotate the pan, and then bake for another 5-10 minutes until the edges are golden brown. The tops will still remain slightly pale but you will see cracks forming on the top and the edges will be golden brown. If you are baking from frozen, the scones will take longer to bake. I would suggest giving them an extra 5 minutes and checking on the color.
-
Once the scones are baked and out of the oven, let them cool on the baking sheet for 10 minutes and then transfer to a cooling rack. You can eat them right away, store in an airtight container on the counter for 3 days, or even freeze them for up to 2 months! I love freezing these scones because they stand up well in the freezer and taste fresh when you pull them out. If I am serving these from frozen, I would recommend letting them thaw at room temperature and then put them in the oven at 300°F for 3-5 minutes or until they are warm and the edges are a bit crisp.